Push Hatch

Adjustable push hatches – “invisible” for tiles and mosaics

Inspection hatches are mainly used for comfortable access to technical communications, ranging from plumbing taps, filters and meters, to pumps, siphons and boilers, elements that require systematic inspection access, maintenance and repair.

To preserve the design, in residential premises, plumbing communications are hidden in bathrooms, in rooms that are mainly tiled with ceramic tiles, such as a bathroom, toilet, boiler room.  The pressure hatch is used both outside and indoors, as well as in rooms with high humidity.

Technical characteristics of the inspection hatch for tiles.

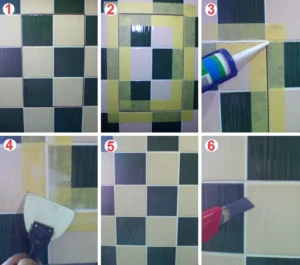
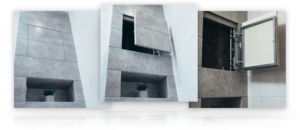
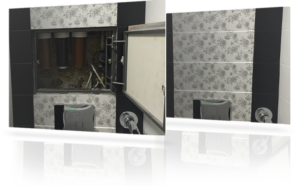
The inspection hatch for tiles has the main feature, thanks to the unique design mechanisms – the hatch, when installed in the opening, facing with ceramic tiles and sealing the seams with silicone sealant, creates the effect of 100% invisibility of the hatch ( invisible hatch ) against the background of decorative finishing, which in turn is important aspect when renovating premises.

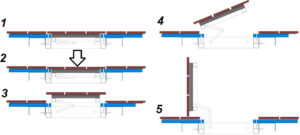
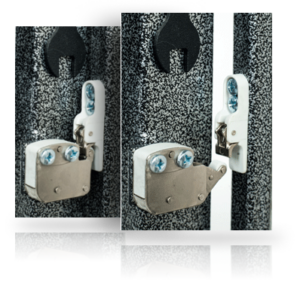
Push hatches gained their versatility thanks to push locks, with the help of which the hatch under the tiles is closed and  opened by lightly pressing  the door; this advantage allows you to line the push hatch with any finishing material. Our Mini-Latch model push locks have a guaranteed service life of 20,000 cycles; if you open the hatch every day, the locks will last you 55 years. Another unique feature of our push locks is their anti-wedge holders, which, in case of jamming of the lock, still allow you to open the hatch door.

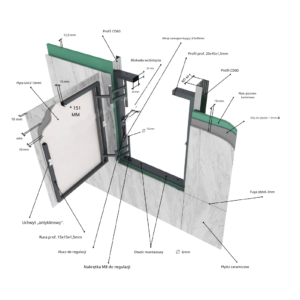
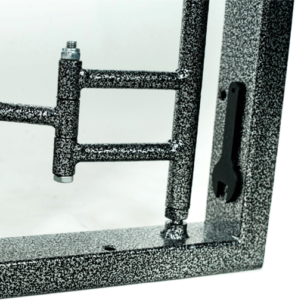
The uniqueness of the design of swing hatches  is focused on two-link, non-sagging adjustable hinges  of the hatch, thanks to which all the gaps between the tile seams will be maintained for the entire service life of the hatch. Also, due to its technical capabilities of a two-link hinge, the hinged hatch door opens in a special way, without chipping the edges of adjacent tiles, which is very important with millimeter-thick seams between the tiles.

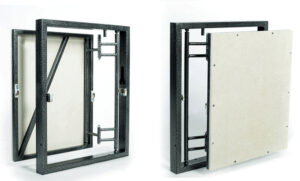
All hatches for tiles of our production are equipped with  a GVLV   plate (moisture-resistant gypsum fiber sheet), which is screwed to the hatch door and acts as a plane for facing with ceramic tiles or mosaics. The characteristics of GVLV boards ( supersheet ) exceed the quality indicators of all analogues, both in increased strength and moisture resistance. To tile a hatch, it is enough to prime the surface of the GVLV slab.

For a longer service life in wet rooms, all metal parts of our hatches are painted with  anti-corrosion hammer enamel , which in turn not only protects the structure from rust, but also gives the product a unique, beautiful look.


The latest high-precision equipment and the professionalism of our employees allow us to produce hatches of precise geometry and adhere to  dimensional accuracy of up to 1 millimeter , which is very important when facing with ceramic tiles. Also, the company’s production capabilities allow us to produce  hatches of any size , according to your individual dimensions, in the shortest possible time and in unlimited quantities.

Thanks to many years of manufacturing experience, we are responsible for the quality of our hatches, and with all responsibility we give a  5-year warranty on pressure hatches for tiles.

Dimensions N/A
Size

200 x 200, 200 x 300, 200 x 400, 200 x 500, 200 x 600, 250 x 300, 250 x 400, 250 x 500, 300 x 200, 300 x 250, 300 x 300, 300 x 400, 300 x 500, 300 x 600, 300 x 900, 400 x 200, 400 x 250, 400 x 300, 400 x 400, 400 x 500, 400 x 600, 400 x 900, 500 x 200, 500 x 250, 500 x 300, 500 x 400, 500 x 500, 500 x 600, 500 x 800, 600 x 300, 600 x 400, 600 X 500, 600 x 600, 600 x 900, 600 x 1000, 600 x 1200

Specification

– Framedoor material :   profile steel pipe 40*20*2;15*15*2; round steel pipe d12
– Door plate : GVLV (moisture-resistant gypsum fiber sheet)
– Accessories : push locks (with anti-wedge holders) “mini-latch” (made in Europe)
– Assembly method : argon-arc welding.
– Painting : anti-corrosion powder/hammer (made in Europe) 
– Opening pattern : swing door (two-link hinges)
– Opening/fixing method : pressing
– Installation method : fastening with self-tapping screws/dowels (holes in frame d6)
– Equipment : technical .passport 

Table of standard sizes of push hatches:

Hatch dimensions (frame) (WxH mm.) Door dimensions (WxH mm.) Door load (kg) Complete hatch weight (kg)
200×300 152×245 9 2.1
200×400 152×345 11 2.3
200×500 152×445 12 2.7
300×200 252×145 9 2.1
300×300 252×245 13 2.5
300×400 252×345 14 3.2
300×500 252×445 16 3.9
300×600 252×545 18 4.6
400×300 352×245 14 3.2
400×400 352×345 16 3.6
400×500 352×445 18 4.3
400×600 352×545 20 5.0
400×900 352×845 27 10.0
500×300 452×245 16 3.9
500×400 452×345 18 4.3
500×500 452×445 20 6.5
500×600 452×545 23 7.7
500×800 452×745 27 10.0
600×300 552×245 18 4.6
600×400 552×345 20 5.0
600×500 562×445 24 8.8
600×600 552×545 30 12.7
600×1000 552×945 32 14.0

Installation

Installation instructions for the “Push” model hatch
 1 ) Prepare an opening for installing the hatch. The size of the opening must correspond to the size of the hatch (see table of standard sizes)
 2 ) Install the hatch in the opening and align the hatch door plate in the same plane with the main wall.
 3 ) Secure the hatch frame in the opening using self-tapping screws or dowels.
 4 ) Prime the hatch door slab and glue the tiles or mosaics. The tile protrusion beyond the door is allowed from 5 to 75 mm.  with the condition that 60% of the tiles are glued to the door plate.
 5 ) After the glue has dried, rub the tile seams, except for the seam along the contour of the door.
Sound insulation and seam sealing.

1) Thoroughly clean the joints along the contour of the tile.

2 ) Cover the outline of the door with masking tape, leaving a gap in the seams.

3) Fill the tile seams along the door contour with silicone sealant.

Attention : Fill the seams along the contour of the hatch door for push-type models only to the thickness of the ceramic tiles. To activate the push locks and open the door – do not allow sealant to get under the tiles!

4) Use a rubber spatula to smooth out excess sealant.

5) Before the sealant dries, remove the masking tape.

6 ) After the silicone sealant has dried, use a knife-blade to cut the seam at an angle of 45 degrees to the entire depth of the sealant.

Attention : To open the hatch door, it may be necessary to remove excess silicone sealant from the tiles glued to the wall (but not from the tiles on the door!)

Scheme of installation and opening of the pressure hatch
Shopping Cart
Scroll to Top