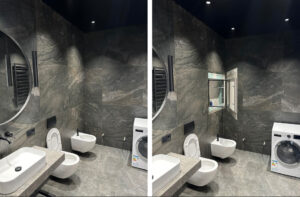
The reinforced inspection hatch is used under semi-matte and smooth tiles, for openings over 600 mm. width and 1200mm. height.
The peculiarity of these hatches is that they are made from more durable materials for heavy loads. In turn, despite their large dimensions, the hatches remain invisible against the background of decorative tiles.
Thanks to the unique technical mechanisms of the design, the hatch during installation can be easily opened by pressing the door and has adjustable hinges.
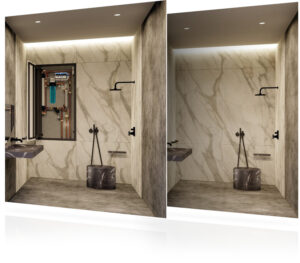
Due to its design capabilities, the main application of the hatch is comfortable access to communication elements, ranging from taps, filters and meters, to pumps, siphons and boilers, to elements that require systematic inspection access, maintenance and repair. Basically, engineering communications are hidden under the surface with tiles or mosaics; in residential premises this is a bathtub, toilet… Modification of a reinforced hatch will provide convenient access for inspection and preserve the interior aesthetic design of the room.
Specification
– Framedoor material : profile steel pipe 50*30*2;20*20*2;
– Door plate : GVLV (moisture-resistant gypsum fiber sheet)
– Accessories : push locks
– Assembly method : argon-arc welding.
– Painting : anti-corrosion powder/hammer
– Opening pattern : swing door (reinforced hinges)
– Opening/fixing method : pressing
– Installation method : fastening with self-tapping screws/dowels (holes in the frame d8)
– Equipment : technical .passportguarantee card
Installation
Installation instructions for the “Reinforced” model hatch
1 ) Prepare an opening for installing the hatch. The size of the opening must correspond to the size of the hatch (see table of standard sizes)
2 ) Install the hatch in the opening and align the hatch door plate in the same plane with the main wall.
3 ) Secure the hatch frame in the opening using self-tapping screws or dowels.
4 ) Prime the hatch door slab and glue the tiles or mosaics. The tile protrusion beyond the door is allowed from 5 to 75 mm. with the condition that 60% of the tiles are glued to the door plate.
5 ) After the glue has dried, rub the tile seams, except for the seam along the contour of the door.
6 ) Apply masking tape along the contour of the door seam, and fill the seam with sealant to match the color of the grout.
7 ) Collect the remaining sealant with a spatula.
8 ) After the sealant has dried, remove the tape and cut the silicone seam with a knife blade at an angle of 45 degrees.


