Today, there are several ways to effectively and conveniently hide utility lines. The pressure hatch for the “Inspector General” tile has proven itself quite well. In its shape, it resembles traditional inspection windows, but if you choose it correctly, you can install it almost unnoticeable.
The “Inspector” pressure hatch is often installed when it is necessary to provide instant access to utilities such as cables, pipes, meters, and so on. The external elements of the lid are often coated for the interior: painted, covered with wallpaper or even ceramic tiles.
Such structures can be easily placed on various types of surfaces, it can be the floor, ceiling, or walls. Moreover, it is possible to install them in plasterboard partitions, inside which communication paths are laid. Often, such hatches are installed under tiles in basements.
The “Inspector” push hatch has a standard opening mechanism: light pressure from the outside causes the mechanical latch to be triggered, which pulls the hatch forward. After this, the cover moves to the side and provides access to the communications located inside.
The product described above has proven itself well, since it is known by a lot of advantages:
· Preserving the appearance of finishing materials, even if they are decorated with patterns or designs.
· Complete invisibility after completion of installation and facing work, since technological seams can be filled with silicone compound.
· Possibility of using almost any facing materials such as natural stone, tiles or even mirrors.
· Durable and reliable design, allowing doors to be faced with heavy building materials.
· Materials that are resistant to water and other factors, and also guarantee excellent sound insulation.
· A special hatch mechanism that ensures complete closure of the front panel without the risk of damaging the facing material.
· Quick and convenient access to utility lines hidden in a niche to be able to detect breakdowns and fix them.
The hatch under the “Inspector” tile is installed in brick, concrete, foam concrete, plasterboard and other walls. The design is available for use in rooms with high levels of humidity (we are talking about the kitchen, bathroom, etc.), as it is airtight and able to withstand heavy loads.
Specification
– Framedoor material : profile steel pipe 40*20*2; 15*15*2; steel circle d12
– Door plate : GVLV (moisture-resistant gypsum fiber sheet)
– Accessories : push locks (with anti-wedge holders) “mini-latch”
– Assembly method : argon-arc welding.
– Painting : anti-corrosion powder
– Opening pattern : swing door (two-link hinges)
– Opening/fixing method : pressing
– Installation method : fastening with self-tapping screws/dowels (holes in frame d6)
– Equipment : technical data sheet ; adjustment key.
Table of standard sizes:
| Hatch dimensions (frame) (WxH mm.) |
Door dimensions (WxH mm.) |
Door load (kg) |
Complete hatch weight (kg) |
| 200×300 |
152×245 |
9 |
2.1 |
| 200×400 |
152×345 |
11 |
2.3 |
| 200×500 |
152×445 |
12 |
2.7 |
| 300×200 |
252×145 |
9 |
2.1 |
| 300×300 |
252×245 |
13 |
2.5 |
| 300×400 |
252×345 |
14 |
3.2 |
| 300×500 |
252×445 |
16 |
3.9 |
| 300×600 |
252×545 |
18 |
4.6 |
| 400×300 |
352×245 |
14 |
3.2 |
| 400×400 |
352×345 |
16 |
3.6 |
| 400×500 |
352×445 |
18 |
4.3 |
| 400×600 |
352×545 |
20 |
5.0 |
| 400×900 |
352×845 |
27 |
10.0 |
| 500×300 |
452×245 |
16 |
3.9 |
| 500×400 |
452×345 |
18 |
4.3 |
| 500×500 |
452×445 |
20 |
6.5 |
| 500×600 |
452×545 |
23 |
7.7 |
| 500×800 |
452×745 |
27 |
10.0 |
| 600×300 |
552×245 |
18 |
4.6 |
| 600×400 |
552×345 |
20 |
5.0 |
| 600×500 |
562×445 |
24 |
8.8 |
| 600×600 |
552×545 |
30 |
12.7 |
| 600×1000 |
552×945 |
32 |
14.0 |
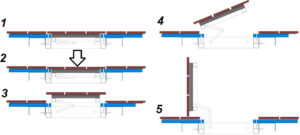
Installation
1) Prepare an opening for installing the hatch. The size of the opening must correspond to the size of the hatch (see table of standard sizes)
2) Install the hatch in the opening and align the hatch door plate in the same plane with the main wall.
3) Secure the hatch frame in the opening using self-tapping screws or dowels.
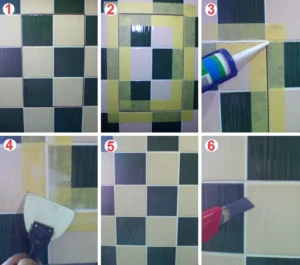
4) Prime the hatch door slab and glue the tiles or mosaics. The tile protrusion beyond the door is allowed from 5 to 75 mm. with the condition that 60% of the tiles are glued to the door plate.
5 ) After the glue has dried, rub the tile seams, except for the seam along the contour of the door.
Sound insulation and seam sealing.
1) Thoroughly clean the joints along the contour of the tile.
2 ) Cover the outline of the door with masking tape, leaving a gap in the seams.
3) Fill the tile seams along the door contour with silicone sealant.
Attention : Fill the seams along the contour of the hatch door for push-type models only to the thickness of the ceramic tiles. To activate the push locks and open the door – do not allow sealant to get under the tiles!
4) Use a rubber spatula to smooth out excess sealant.
5) Before the sealant dries, remove the masking tape.
6 ) After the silicone sealant has dried, use a knife-blade to cut the seam at an angle of 45 degrees to the entire depth of the sealant.
Attention : To open the hatch door, it may be necessary to remove excess silicone sealant from the tiles glued to the wall (but not from the tiles on the door!)
Scheme of installation and opening of the pressure hatch