Euro Hatch

Invisible hatch for painting and EURO wallpaper

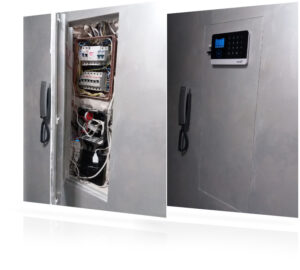
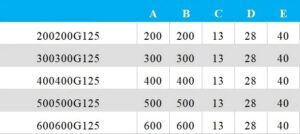
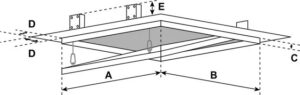
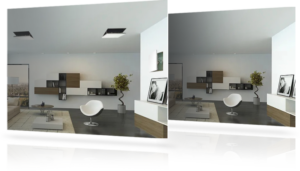
The “invisible” hinged hatch for painting and wallpaper of the “Euro” model provides easy access to various engineering systems: electrical, plumbing, ventilation, etc. The hatch is installed in plasterboard structures directly under the plasterboard, both in horizontal planes (in walls) and in vertical planes (in ceilings), without disturbing the appearance of the overall finish.


Advantages of “Euro” hatches

Let’s highlight the main advantages of hidden hatches for painting of the “Euro” model:
– Invisibility. The installed hatch does not have a visual impact on the overall interior decoration; in fact, it is “invisible” – unnoticeable.
-Ease of use. Mini-Latch push locks are very easy to use and also have increased reliability with a guarantee of 20,000 cycles: if necessary, you can easily open or close the hatch by simply pressing your finger on the door. When opening the door, it is held in place by a special latch, which in turn prevents the door from spontaneously falling out.
– Easy installation. The hatch frame is secured with self-tapping screws directly to the plasterboard sheet, which will simplify the work and also simplify the finishing of the cover itself. A competent technician can easily handle the installation. To install a paintable hatch, you need primitive tools and basic knowledge in the field of repair.
– Guarantee. Technical guarantee for this products is for 5 years.
– Reliability. The hatch structure is made of aluminum, which is resistant to corrosion and has increased mechanical stability. The durability of Euro hatches is one of the main reasons for their popularity. A moisture-resistant sheet of plasterboard is attached to the hatch doors, which prevents delamination of the slab. European push locks have a service life of at least 20,000 cycles.

Dimensions N/A
Size

150 x 150, 200 x 200, 300 x 200, 400 x 200, 500 x 200, 600 x200, 300 x 300, 400 x 300, 500 x 300, 600 x 300, 400 x 400, 500 x 500, 500 x 400, 600 x 400, 600 x 600, 150 x 150, 200 x 200, 300 x 200, 400 x 200, 500 x 200, 600 x200, 300 x 300, 400 x 300, 500 x 300, 600 x 300, 400 x 400, 500 x 500, 500 x 400, 600 x 400, 600 x 600, 1500 x 800, 1500 x 900, 1500 x 1000, 1800 x 1200, 2000 x 1200, 2200 x 1200, 2300 x 1200, 2400 x 1200, 2500 x 1200, 2500 x 1300, 2700 x 1100, 2700 x 1200, 2700 x 1300, 2750 x 1000, 2750 x 1200, 2750 x 1300, 2750 x 1400, 2750 x 1500, 500 x 500, 600 x 500, 600 x 600, 600 x 700, 600 x 800, 600 x 900, 600 x1000, 600 x 1200, 650 x 650, 700 x 500, 700 x 700, 700 x 800, 700 x 900, 700 x 1000, 700 x 1200, 750 x 750, 800 x 500, 800 x 800, 800 x 900, 800 x 1000, 800 x 1200, 850 x 850, 900 x 900, 900 x 1000, 500 x 500, 600 x 500, 600 x 600, 600 x 700, 600 x 800, 1500 x 800, 1500 x 900, 1500 x 1000, 1800 x 1200, 2000 x 1200, 2200 x 1200, 2300 x 1200, 2400 x 1200, 150 x 150, 200 x 200, 300 x 200, 400 x 200, 500 x 200, 600 x200, 300 x 300, 400 x 300

Specification

 – Frame/door material :   aluminum profile
– Door plate : GKLV (moisture-resistant plasterboard sheet)
– Accessories : “mini-latch” push locks
– Assembly method : welding
– Opening pattern : swing door 
– Opening/fixing method : by pressing
– Installation method : fastening with self-tapping screwsdowels  
– Contents : technical data sheetwarranty card

Installation

Installation instructions for the hatch model “Euro”
 1 ) Prepare an opening for installing the hatch. The size of the opening must correspond to the size of the hatch 
 2 ) Install the hatch in the opening and align the hatch door plate in the same plane with the base.
 3 ) Secure the hatch frame in the opening using self-tapping screws.
 4 ) Prime the hatch door plate and cover the surface with finishing material.
Shopping Cart
Scroll to Top