


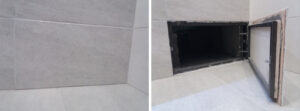
An invisible hinged hatch is an effective design that allows you to disguise hidden spaces in a room and at the same time provide easy access to them. In a niche you can place a water meter or valves, hide siphons or water filters. Using a swing hatch, you can create the effect of a solid tiled surface. Simply opening the structure will allow you to gain access in a second to take readings, close or open taps, and perform maintenance.
Thus, hinged hatches for tiles can be used everywhere in the bathroom, toilet, and kitchen. The application is not limited to this: you can use the product to close a niche in the wall in which a safe or secret cabinet is located. But the use of hatches to disguise plumbing elements is still more common.
The design consists of an outer frame and a door frame on which a flat plate is attached. It is enough to cover this slab with solid unedged tiles to create a magnificent camouflage effect.
Attention: the swing hatch is only suitable for tiles with a smooth surface. For other options, it is better to use pressure hatches.
Advantages of hinged hatches
Modern invisible hinged hatches are recognized by an impressive list of advantages. This makes them versatile and practical for any application. The main advantages of the designs:
reliable locks on the door – spontaneous opening and falling out are excluded;
opening the lid is simple, quick and easy;
structurally provided protection against jamming – eliminates damage to expensive tiles;
It is allowed that the dimensions of the tiles be larger than the dimensions of the hatch. Thanks to this, you don’t have to select the product exactly according to the size of the opening;
the seam between the tiles can be treated with silicone grout – with this you can make the hatch parameter invisible;
the closed invisible hatch under the tile merges with the tiled surface. The size or design is not affected.
All products are universal – they are designed for openings of different sizes. This allows you to place any number of objects in a niche and provide quick access to their maintenance. To install the structure, you do not need to have specialized skills – any tiler can handle the task.
Specifications
Hinged invisible hatches are made of profile steel pipe (pipe cross-section for the frame – 40×20 mm, for the door – 15×15 mm). A slab of gypsum fiber moisture-resistant sheet is attached to the door. European-made roller locks are used as accessories. The metal elements of the structure are connected by argon-arc welding with thin seams and covered with an anti-corrosion layer of paint. This method of assembly and processing is the most reliable, guaranteeing long-term operation of the product.
Using gypsum fiber sheet is the best option. Thanks to this, the invisible swing hatch is resistant to operating conditions (in particular, high humidity). In addition, the tiles adhere very well to the surface of the slab.
To attach the hatch frame to the opening, it is enough to use self-tapping screws or dowels. The door is attached to the frame using specially designed hinges. To open the hatch you need to use suction cups, which are included in the standard design kit. It is enough to attach them to the surface and pull them towards you a little.
How to choose a swing hatch?
The main thing is to choose hinged hatches for tiles of the appropriate size. For this purpose, convenient tables are provided that indicate the parameters of all available models in the series. The size indicated in the table corresponds to the dimensions of the outer frame. The door is smaller, which makes it possible to avoid having to adjust the hatch very precisely when installing it in the inspection opening. Allowable spread is up to 10 mm in any direction. Accordingly, when gluing the tile to the door, it is also easy to adjust with the main layers.
It is ideal if the swing hatch is the same size as the parameters of one or more tiles that will be attached to the door. For example, if 2 200×200 mm tiles are attached to a 200×400 mm hatch.
When choosing, keep in mind that protrusion of the glued tiles is allowed up to 50 mm from different sides. The main requirement is that the coincidence of the tiles with the door is at least 60%. This greatly simplifies the choice and allows you to find a standard model in most cases. Attention: you need to choose a design at the stage of rough finishing of the room, knowing exactly the location and dimensions of the opening, the type and parameters of the tile intended for cladding.