Optimal Hatch

Floor hatch for Optimal tiles on shock absorbers

Description of the “Optimal” hatch
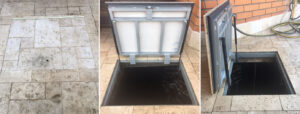
The “Optimal” floor hatch is a revision model of hidden installation and is placed directly into the floor or ceiling. Invisible hatches of the “Optimal” type are self-lifting hatches on gas shock absorbers, which work to provide easy access to all communications located below floor level. These hatches are completely sealed and can easily be used outdoors.

Where are Optimal hatches used?
Floor hatches for “Optimal” type tiles are designed for installation and use both indoors and from the inside. Floor coverings such as linoleum, mosaic, carpet, tiles can be glued to the cover of this product…

Advantages of “Optimal” hatches
-Tightness. Floor hatches of the “Optimal” type are our new development. Their advantage over other similar hatches is their complete tightness.
– Versatility. These hatches can be safely used outdoors and are not afraid of any natural phenomena.
– Withstands heavy loads.
– Easy and quick access to communications.

Design of the “Optimal” hatch
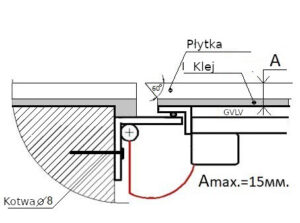
This hatch contains an external frame equipped with a metal corner profile, and in addition a cover frame based on a pipe with a rectangular cut. The outer frame is welded with a square pipe, and the frame itself is reinforced with a welding cross.
A gypsum-fiber moisture-resistant board is screwed to the frame of the hatch cover with self-tapping screws, and parts of the floor covering are already glued to it.

Dimensions N/A
Size

600 x 500, 600 x 600, 600 x 700, 600 x 800, 600 x 900, 600 x1000, 700 x 500, 700 x 700, 700 x 800, 700 x 900, 700 x 1000, 800 x 500, 800 x 800, 800 x 900, 800 x 1000, 900 x 900, 900 x 1000, 1000 X 1000, 500 x 500, 600 x 500, 600 x 600, 600 x 700, 600 x 800, 600 x 900, 600 x1000, 600 x 1200, 650 x 650, 700 x 500, 700 x 700, 700 x 800, 700 x 900, 700 x 1000, 700 x 1200, 750 x 750, 800 x 500, 800 x 800, 800 x 900, 800 x 1000, 900 x 900, 900 x 1000, 900 x 1200, 1000 x 1000, 500 x 500, 600 x 500, 600 x 600, 600 x 700, 600 x 800

Specification

-Framedoor material :  steel corner 50*50 mm, steel profile pipe 30*20 mm.
– Assembly method : argon-arc welding.
– Painting : anti-corrosion – hammer 
– Opening pattern : swing door with shock absorbers 
– Opening/fixing method : pressing with a rotary key
– Installation method : fastening with anchors/dowels 
– Equipment : technical data sheet, rotary key, lock – latch, gas shock absorbers 2 pcs., GVLV plate, rubber seals.

Table of sizes the “Optimal” model

Hatch model WxD (mm) Clear dimensions WxD (mm) Cover frames WxD (mm) Opening dimensions WxD (mm) Hatch dimensions WxLxD (mm)
600×600 590×520 630×545 600×600 700x650x120
700×700 690×620 730×645 700×700 800x750x120
800×800 790×720 830×745 800×800 500x800x120
900×900 890×820 930×845 900×900 1000x950x120
1000×1000 990×920 1030×945 1000×1000 1100x1050x120

Installation

1 ) Prepare an opening for installing the hatch. The size of the opening must correspond to the size of the hatch (see table of standard sizes) 
2 ) Install the hatch in the opening and align the hatch cover with the main floor using a level.
3 ) Secure the hatch frame in the opening using anchors or dowels with a diameter of 8 mm. through the holes in the hatch frame.
4 ) Prime the surface of the hatch cover.
5 ) Glue the tile onto the manhole cover (on the GVLV slab) following the recommendations of the diagram.
Scheme for tiling a manhole cover with ceramic tiles:
Shopping Cart
Scroll to Top