How to install a floor hatch?
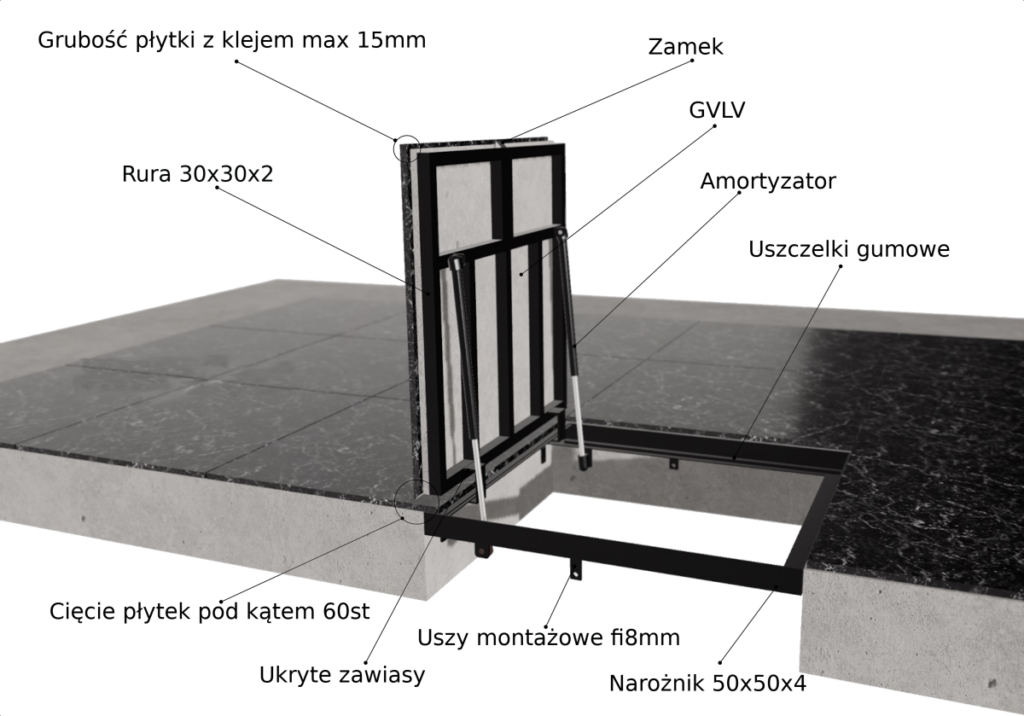
Each floor hatch consists of two main parts: a frame and a cover. During installation, the frame is mounted in the floor. As a rule, a rubber gasket is used to seal it, which guarantees an airtight and tight closure. The manhole cover, which is a shallow container, is filled with the same cladding that covers the floor, in this case tiles. The cover is first secured with shock absorbers or using special hinges. The installation process is performed in a certain sequence:
Installation
- First you will need to prepare the opening. It is leveled horizontally. If necessary, it can be reduced in accordance with the size of the hatch by installing metal profiles.
- Mounting holes are made in the ceiling. The hatch is installed and secured to the surface with dowels or anchors.
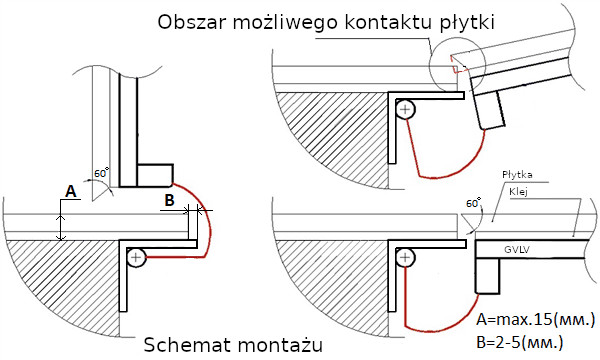
- Before you start tiling the hatch, it should be closed with a special valve, which is usually included in the kit. It is necessary to avoid accidental opening of the hatch during operation. It is permissible to open the hatch cover only a day after it has been lined.
- A primer is applied, then the section is tiled. It is advisable that the dimensions of the tile and the manhole cover match each other. If the tiles are smaller, a whole number of tiles should be used for finishing. Otherwise, even through a closed hatch, it will be clearly visible in the middle of the floor.
- At the final stage, all seams are rubbed, with the exception of one covering the perimeter. It is cleaned, sealed with tape on both sides and filled with sealant both deep and just above the surface.
- The tape and excess sealant are removed, and the seam is cut to its full depth using a sharp knife. At the final stage, the remaining sealant is removed.
Technical characteristics
-Frame\door material : steel corner 50*50 mm, steel profile pipe 30*20 mm.
– Assembly method : argon-arc welding.
– Painting : anti-corrosion – hammer
– Opening pattern : swing door with shock absorbers
– Opening/fixing method : pressing with a rotary key
– Installation method : fastening with anchors/dowels
– Equipment : technical data sheet, rotary key, lock – latch, gas shock absorbers 2 pcs., GVLV plate, rubber seals.
Table of sizes of standard floor hatches of the "Light" model:
| Hatch model WxD (mm) | Clear dimensions WxD (mm) | Cover frames WxD (mm) | Opening dimensions WxD (mm) | Hatch dimensions WxLxD (mm) |
|---|---|---|---|---|
| 600x600 | 500x500 | 535x585 | 600x600 | 600x600x120 |
| 700x700 | 600x600 | 635x685 | 700x700 | 700x700x120 |
| 800x800 | 700x700 | 735x785 | 800x800 | 800x800x120 |
| 900x900 | 800x800 | 835x885 | 900x900 | 900x900x120 |
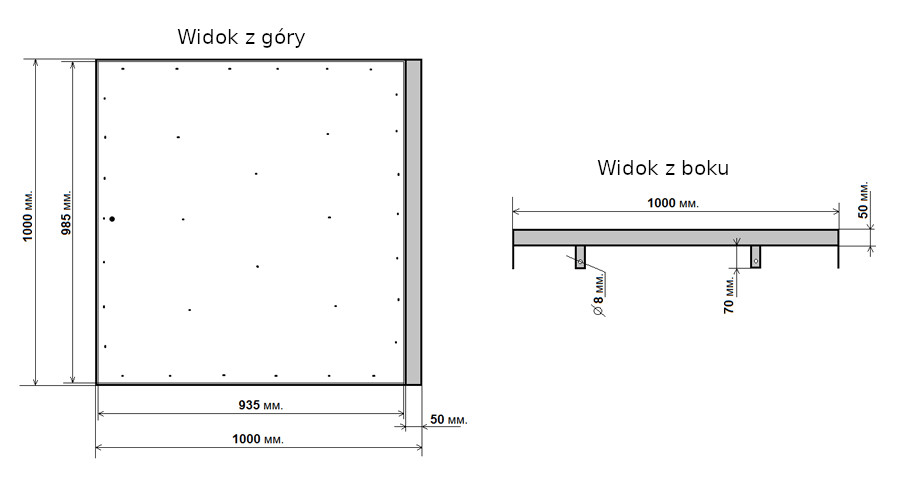
| 1000x1000 | 900x900 | 935x985 | 1000x1000 | 1000x1000x120 |
| 1100x1100 | 1000x1000 | 1035x1085 | 1100x1100 | 1100x1100x120 |
Diagram of the floor hatch of the "Light" model, size 1000mm.*1000mm.
Installation instructions for the hatch model "Light"